How to Take Screenshots on a Mac
On a Mac, you can take screenshots with some short keyboard shortcuts. however Mac OS X also includes more powerful screenshot gear, too. right here are a number of the various methods you may get a screenshot on OS X.
Take a Screenshot of Your Entire Screen
Permit’s start with the ones keyboard shortcuts. To take a screenshot of your complete display, press Command+Shift+three. Press all three keys immediately and your Mac’s desktop will flash, you’ll pay attention a digital camera sound, and the screenshot will seem on your computing device as a .png file.
Take a Screenshot of Part of Your Screen
To take a screenshot of a part of your screen, press Command+Shift+four as an alternative. Your mouse cursor will become a crosshair icon. click on and drag to choose part of your display screen. launch the mouse button and that a part of your display could be stored as a .png file in your desktop. To cancel the screenshot, press the Esc key.

Take a Screenshot of a Window
you could also take a screenshot of a selected window. First, press Command+Shift+4. Your mouse cursor will turn into a crosshair. Press the Spacebar and your mouse cursor will grow to be a digital camera icon alternatively. move your cursor over the window you need to screenshot and it will appear highlighted. click the window and a screenshot of that window will appear for your laptop as a .png document.

Save Your Screenshot to the Clipboard Instead of a File
in case you’d want to store a screenshot in your clipboard so that you can paste it into an software in place of saving it to a record, simply add the manipulate key to the shortcuts above. for example, you’d press Command+Shift+manipulate+three in preference to Command+Shift+3 and Command+Shift+manipulate+4 rather than Command+Shift+four. (Yeah, you’ll need plenty of arms for this.)
you can then use Command+V to stick the screenshot into an utility, or click Edit > Paste in the software.
Change the Folder Where Your Mac Saves Screenshots
Screenshots you're taking with the keyboard shortcuts might be saved directly on your Mac’s computer with the filename “display screen Shot [date] at [time].png”. however, you may change in which your Mac saves those screenshots, if you like. for instance, you can make your Mac save screenshots without delay to a Dropbox, Google force, or Microsoft OneDrive folder.
Take a Timed Screenshot With the Grab Application
In some cases, you may want to take a screenshot the use of a timer. You start the timer, which lasts for some seconds. while the timer expires, your Mac will take a screenshot of your whole screen. that is useful when you could’t take a screenshot of something–a menu, as an instance–that hides itself while you start pressing the keyboard shortcut keys.
To try this, use the snatch app included along with your Mac. you could launch it by urgent Command+space to open highlight seek, typing “snatch”, and urgent “enter.” you may additionally open the Finder and locate it at packages > Utilities > snatch.
snatch won’t open a window to your laptop, but launch it–or click on it in your dock–and also you’ll see a seize menu on the pinnacle of your display. click on seize > Timed display to take a timed screenshot.
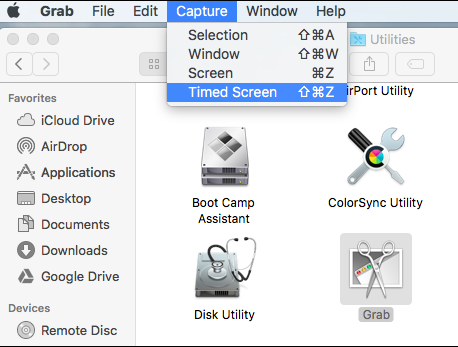
click on “Srart Timer” inside the Timed screen grasp window and also you’ll see the timer be counted down.

Your Mac will take a screenshot after ten seconds and it's going to seem within the snatch window. click record > keep to save the screenshot if you’re glad with it.
you can additionally use the snatch software to take other types of screenshots with the capture > selection, capture > Window, and seize > display options. however, you’ll possibly locate it simpler to take screenshots the usage of the above keyboard shortcuts.

Take Screenshots With a Third-Party Application
There are a wide style of 1/3-birthday party apps on your Mac that can help you take screenshots, too. Many humans have their very own favored software, but we’ve used and like Skitch for Mac.
Evernote purchased Skitch and has killed off the Skitch programs for all other systems, however still gives the Mac app–likely as it’s so famous. Skitch gives a ramification of easy editing features for easily resizing, cropping, and staining up your screenshots. It’s also absolutely free. You don’t even want to register with an Evernote account to apply it.

once you've got your screenshots, you may double-click the .png documents to open and examine them within the Preview app covered with Mac OS X (except you’ve selected any other image application as your default software for PNG documents). Preview additionally protected a selection of a ramification of gear for enhancing those screenshots and different images. To document a video of your Mac’s screen rather than a screenshot, use the QuickTime application covered with Mac OS X.


0 on: "How to Take Screenshots on a Mac"