In case you’re the usage of a USB dongle that lets in your laptop to obtain a wi-fi connection, you can have noticed that your net speeds are slower than anticipated. In a few instances, loads slower. unfortunately, that is a common hassle for USB wireless dongles.
What causes this slowdown? In three words: other wireless devices
Wireless gadgets transmit information using frequencies, and these frequencies are invisible but they have their own wonderful shapes. The trouble happens while two or more devices transmit records using the same frequency shapes (i.e., on the identical frequency channel).
Sadly, there are a totally restricted variety of frequency channels available within the 2.four GHz variety — and maximum wireless peripherals transmit on 2.4 GHz, together with Bluetooth, Logitech USB dongles, and extra. They’re all at the equal wireless spectrum, which results in wireless congestion and disorder.
To illustrate, here’s what the two.four GHz spectrum looks as if: - Gem Valley
Gem Valley
Word how there are only 3 channels (1, 6, and eleven) that do not overlap with each other. if you use multiple gadgets on the two.4 GHz frequency, your wi-fi net speeds without a doubt aren’t most advantageous, and purchaser electronics suffer majorly from those overlapping frequencies.
While devices transmit on overlapping channels, their transmissions can intrude with every other, ensuing in sluggish overall performance, limited variety, and lag.
Why is it this manner? properly, while the two.4 GHz spectrum first came into use, engineers never expected that the average domestic could come to consist of dozens of different wi-fi alerts. That’s the motive why the 5 GHz band turned into invented (why dual-band routers depend).
So how can you fix this difficulty? There are three methods you may try.
Use a USB Extender
The simplest alternative is to apply a USB extender. the main benefit here is that USB extenders permit you to reposition the area of your USB wi-fi adapter.
now not best does channel overlap motive dongles to misbehave, it’s also cumulative while combined with the radio-frequency-blocking homes of a pc case or metal computer. almost universally, repositioning the dongle improves the dongle’s performance.
In truth, many dongle manufacturers include an extender through default because of this. as an instance, the Steam Controller (our evaluation of the Steam Controller) consists of a weighted extender with a microUSB cable attached.
Gem Valley
Amazon stocks a massive wide variety of USB extenders, cradles, docks, and hubs. someone of those options will provide an improvement in dongle performance — however the pleasant will tilt the dongle at a vertical angle, which maximizes the dongle’s exposure to wireless frequencies.
Even better, it shouldn’t use a metal case, which could interfere with wireless alerts. My favorite from Amazon is the Weme four-Port USB statistics Hub, which possesses all of the aforementioned traits and might join up to 4 devices.
however, in case you need extra capability from your hub, test out the Geekdigg USB Hub & Card Reader. It throws in a microSD and miniSD card reader, along side a removable microUSB cable.
Change Your Wi-Fi Router Channel
The three non-overlapping channels utilized by wireless-N and wi-fi-G routers divide into eleven one of a kind overlapping channels. at the same time as Bluetooth devices robotically alternate their channel to the least-used frequency, many other devices do not.
On pinnacle of that, it’s not possible to trade how dongles transmit records. So while conflicts arise, the best alternative is to change the channel that your router publicizes on. I wrote a manual on how to regulate wi-fi channels so I gained’t move into detail right here, but it’s a easy two-step system:
Use a wi-fi analyzer app to discover the premier channel.
Log into your wi-fi router and trade to the best channel.
We've got a superb manual on a way to get admission to your router’s settings, so take a look at that out if you’ve by no means modified any of your router’s settings earlier than. the article covers most of the nuances required for most of the people of gadgets accessible. It shouldn’t take greater than a minute of your time.
Get a Dual-Band Router
Buying a new router is by using some distance the maximum highly-priced alternative, however for condo-dwellers it’s fantastically advocated as it has the best fee of achievement in boosting slow wireless dongle speeds.
As stated above, maximum routers broadcast indicators on either 2.four GHz and five GHz. at the same time as the two.four GHz band gives 3 non-overlapping channels, the 5 GHz band produces a whopping 23 non-overlapping channels. mixed with the other benefits of using 5 GHz, you’ll be aware a huge improve in overall performance.
Gem Valley
However, you would also need to make certain that most, if not all, of your different gadgets can use the 5 GHz spectrum. If few or none do, you wouldn’t benefit in any respect from the use of a dual-band router.
Also, if you’re experiencing problems with a wireless adapter USB dongle, a new router would only make sense if the dongle itself is likewise dual-band! otherwise it might maintain to broadcast and receive over the identical complex portion of the wi-fi spectrum.
Wirecutter recommends buying the Archer C7 twin-Band Router, which offers throughout-the-board overall performance and wi-fi-AC, the state-of-the-art wi-fi fashionable. then again, in case you want to take your private home community to the following degree with IFTTT (what's IFTTT?), try out the D-link ultra Tri-Band Router (our D-hyperlink extremely assessment).
Which One Is the Best Method to Speed Up Wingle?
You is probably tempted to try the unfastened choice first, earlier than buying either a USB hub or a twin-channel router. That’s a reasonable direction to take.
But, in preference to playing along with your router’s settings (that may purpose additional troubles), you would possibly get more mileage out of simply buying a USB extender or hub. The fee hovers round $five and has the first-class danger of quick solving your issues.
Fix slow internet, how to Speed up Wifi, Speed up dongle, Speed up wingle,Speed up PTCL Evo or Charji, Gem Valley
Microsoft phrase now arrives on our systems chocked complete of useful templates, styles, and subject matters to help shape the layout of your document. Microsoft has created a pretty top gadget: immensely open for an absolute beginner, however with sufficient depth to be constantly used for the duration of the commercial enterprise global.
Customizing your report format settings is simple, and we’ll show you the way to do it in phrase 2013 and word 2016.
What Can You Change?
Many, many stuff. We’ll begin with the quick get right of entry to Toolbar Tabs you see without delay when opening a new word record, with a focal point on the home, Insert, design, and layout tabs as they contain the majority of the report customization tools you’ll want.
Home: Fonts, Paragraphs, and patterns, as well as Clipboard and editing options
Design: topics, together with colorings and fonts, and web page Backgrounds
Format: web page Setup, Paragraphs, and arrange
Those are your manual gear. you may set up a number formatting options before you begin editing your record to make sure the equal structure and fashion is implemented at some stage in, as well as the use of the identical gear to edit your record whilst paintings is in development. You’re possibly acquainted with how to change the Font, shades, sizes, and how to practice the bold, Italicized and underlined codecs in your textual content. those are effortlessly applied.
Styles
However it is able to be tons quicker and commonly lots less difficult to use pre-designed styles to your record as you move thru. The patterns are made from man or woman settings, so constantly practice the equal formatting for your report. there may be a style for “Heading 1” so one can seem the equal within an internet-page. there may be a “identify” style which applies a 28pt font and condenses the textual content slightly. there's a “Quote” style which applies an indent to the left and right of the document, italicizes your text, and presents it a different colour. for example:
This became a completely quick snippet illustrating a way to follow simple patterns to your document. mess around with the opposite patterns and learn the way they have an effect on the visible presentation of your work, and what a difference that could make to your reader (and also on your personal workflow!).
You’re first-rate stylish, proper? proper, because I’m not. i've a large ginger beard and the whole thing. enough of that. inside the video I showed you how to access the extra patterns menu. it's miles the tiny arrow indicating there is a pop-out menu awaiting your inspection. as an alternative, hit CTRL + SHIFT + ALT + S. At the lowest of the new styles menu are 3 icons:
New Style: quite self-explanatory. in case you find your self often tweaking a particular aspect of your phrase file format, you have to genuinely turn it into an without problems applicable custom fashion.
Style Inspector: The style Inspector may be quite on hand in case you receive a document with lots of recent and “unusual” formatting. simply open the inspector and pick out the place of the file you’d like to recognize more about. you can additionally reset the formatting for the selected textual content from inside the inspector, the usage of the pink eraser icons on the right.
Manage Styles: you can use the manage patterns option to make any alterations to current styles, together with your own.
While developing your very own style, you don’t have to start from scratch. The alternatives style kind and Base style on may be accessible to make mild tweaks to current styles, suiting them to your modifying needs. just make certain to keep them as some thing one of a kind!
Themes
Nestled within the layout tab are alternatives for topics and file Formatting. just as a fashion applies a selected set of formatting commands to a unmarried phase (or a whole report, if you want), a subject matter is designed to layout your whole file, altering all the available patterns.
Of the excellent features of the subject matters section are the interchangeable colors and fonts.
After you’ve decided on your subject, you could modify the aesthetic of the report using one of the pre-designed colour schemes, or layout your personal.
Similarly, you can pick from collections of fonts as a way to be carried out during the file. it is a very easy way to alter the visible presentation of your file at the same time as maintaining a uniform, professional approach.
file Formatting applies a entire “fashion set” for your report. as an instance, inside the above video, the Heading 2 formatting style is a fashionable, while within the subsequent quick clip, you’ll see the same Heading 2 style (and identify fashion) change as I rollover each record Formatting alternative.
Every other reachable, however underused device is consequences. just as deciding on a theme alters the arrival of the text and formatting, choosing an impact alters the appearance of every image in the course of the report. There are alternatives for ordinary office, Glow edge, extreme Shadow, and lots more, so you can select one which suits the voice of your work.
Templates
There are different extraordinarily easy ways to apply steady formatting at some stage in your whole document. Microsoft included literally hundreds of free templates which will use, protecting a big variety of topics. need a enterprise report for a picture design outfit? You’re protected. need Valentine’s Day Sweetheart Supper & Pie auction invitations (wat?!)? For a few reason, you’re blanketed.
And although I poke amusing on the latter of these examples, the templates may be tweaked in your very own specifications extraordinarily without problems within word, the use of the opposite design and layout gear available to you.
pick out any template, and open it. examine the layout of the record: where the indents are, where the text containers are located, if any particular styles had been carried out, after which have a little play around. move things, click on things, alternate settings, and also you’ll apprehend more about the composition of the template.
3 Advanced Formatting Tips
To round our word layout settings article off, I’ll percentage 3 superior formatting tips with you.
1. Section Breaks
Phase breaks are a crazy useful formatting device, in particular if running on a document consisting of different facets of information that could gain from an person style. for instance, you could observe custom formatting to a unmarried region, together with an opportunity header or footer, or even a whole new web page numbering gadget, but importantly leaving the relaxation of the record intact.
Head to the format tab, and pick out Breaks. it'll open a drop-down menu containing numerous alternatives:
Choose a section destroy that fits your record, however note that putting a next page phase smash may also insert a page damage, which can be elaborate, if that isn’t what you’re after. In this example, use the continuous break choice.
when you put in force a selected segment style you want, you may constantly reproduction it to the following section ruin.
2. Using Find and Replace
This slightly unnoticed formatting tool can be a lifesaver when performing modifying responsibilities, but the usage of the locate and replace tool permit you to scour the complete report for the particular formatting troubles you want to change.
Press CTRL + H to open the discover and replace tool. within the bottom-right you must spot layout, which opens a drop-down menu. you may now pick from the variety of additional replacement fields. every options opens a new speak container wherein you could specify what you’re attempting to replace, and leaving the discover What/update With fields empty will trade all the matching formatting.
3. Formatting a List
You’d suppose changing the arrival of a numbered listing could be jolly easy, however it may be relatively irritating.
Head to the home tab. within the Paragraph segment, look for the paragraph image and choose it.
Take a look at the end of each entry in your numbered listing.
You could now pick out the person paragraph markers. while you’ve decided on the list objects you’d like to trade (maintain CTRL whilst making your selection to edit more than one options), head to the house tab and pick out the format you’d decide upon from the drop-down list options.
Bonus Tip: Display Shortcuts
Microsoft word does a pretty precise activity of displaying you ScreenTips wherein feasible. just hover over nearly any icon and you’ll get a minute snippet of information detailing exactly what the button does. you may make those ScreenTips extra thrilling by way of including their applicable shortcut, so each time you rollover to check, you could try to bear in mind the shortcut alternatively.
Head to File > Options > Advanced. beneath Display, make sure Show shortcut keys in ScreenTips. Then press ok.
Bonus Tip 2: Configure Your Cut and Paste Settings
That is some other tiny tip, but if you’re pasting snippets of text from different files or packages, it can make a large distinction.
Head to File > Options > Advanced. Under Cut, copy, and paste you’ll see five options:
Pasting within the same file
Pasting between files
Pasting among documents whilst fashion definitions war
Pasting from other packages
Insert/paste snap shots as
Pick whether or not you’d like your pasted text to preserve source Formatting, Merge Formatting, or keep text handiest. There also are other options in an effort to don't forget. as an instance, even after ensuring the formatting of any text copied from another application might be merged, i like to look the display Paste alternatives button, simply in case I want to make an alteration.
Formatting in Word Online
Word online is part of the unfastened online workplace suite supplied by Microsoft. It permits you to create and edit documents for free, provided you have a Microsoft account. word on-line gives a great deal of the capability of the laptop model, but there are a few formatting omissions you would possibly bump into.
The bottom stage of formatting is all as wellknown, however on-line doesn’t include guide for issues or phase Breaks, as well as most effective allowing “Portrait” as your record orientation. similarly, whilst your indents and tab settings can be imported from the computing device version of word (or someplace else), word on line also restricts rulers and gridlines, so adding more can show hard.
but, if you are looking to make a few basic edits at the flow, or sincerely haven't any need for the additional formatting strength of phrase itself, word on line makes a solid substitute.
Go Forth and Make Things Pretty
You currently have the understanding to make any word report stunning, easy to examine, with oodles of visually enticing formatting. make the effort to play with the formatting settings. if you get yourself up to speed with the primary formatting settings, you’ll discover more superior formatting options a synch!
How to Customize Microsoft Word Layout, Theme, Template Settings - Gem Valley
In Every 12 months, Apple holds its worldwide builders convention (WWDC) in San Francisco, in which the organization defines its software program roadmap for the yr to return. Apple sells greater iPhones than another product and offers its updates freed from price typically on the quit of September.
if you didn’t see the declaration, otherwise you’re most effective inquisitive about the essential bits, here’s what you neglected.
Delete Stock Apps
Whilst this wasn’t stated by using Apple, customers strolling the beta are reporting it’s viable to delete stock apps in the iOS 10 beta, and a bunch of Apple’s own apps have appeared on the App keep, which seems to corroborate this. a number of the apps customers can put off consist of: Calendar, weather, Maps, movies, Notes, Reminders, shares, iTunes store, home, FaceTime, guidelines, Calculator, and greater.
It’s constantly possible that Apple will reverse their choice, but it’s also some thing users had been looking for a while. in addition to allowing you to customize your iPhone extra than ever earlier than, this would allow customers suffering for space to delete the apps they in no way use. whether or now not you may “update” a stock app like Mail with a third party app like CloudMagic and have it act as a default isn't clean yet.
If this is blanketed inside the very last launch someday q4, it’s just some other example of the organization taking note of customers and providing the functions they need to look.
Other Apps Can Now Use Siri
at the same time as it might not sound like a big deal at the floor, Apple announced the arrival of the SiriKit API for builders. this indicates third birthday celebration apps could be able to take advantage of 0.33-party apps within the equal way first-party apps do.
So whilst it’s not a large deal proper now, by the point a number of your favourite app developers get their hands grimy, you’ll be able to do such things as order an Uber to your vicinity by means of shouting at your cellphone, control Spotify or different streaming offerings in a similar manner to Apple tune, dictate notes straight to your preferred notice-taking app in place of Apple Notes, and even ship WhatsApp or fb messages using the smart assistant.
as the feature relies upon on 1/3-celebration builders, you’ll need to watch for them to implement the generation first — but Apple just provided the toolbox that makes it viable.
New Messages Features
Probable the biggest listing of adjustments in iOS 10 belongs to the Messages app, which, although purposeful, hasn’t developed all that plenty over the previous couple of revisions. customers can now use emotive message bubbles that “shout” or “whisper” and canned animations for things like “happy Birthday” that display over the complete screen. you may even add markup, like ambitious and italic for your messages.
Like many different messaging apps, wealthy textual content inking has been delivered, which lets in you to ship messages for your handwriting, or scrawl badly illustrated photos to contacts. those handwritten notes could be lively on receipt, so it’s much like you’re writing (or drawing) on the screen.
the usage of end-to-cease encryption already makes iMessage a enormously secure platform, and now Apple has added a characteristic known as Invisible Ink to higher guard privacy too. It lets in you to ship messages or photographs which can be pixelated till the recipient swipes them.
hyperlinks you get hold of will now be displayed in-line, so you don’t ought to leave Messages to play a YouTube video or Apple song songs. you could also reply to whatever with a brief in-line response, which allows you to “like” a message with a thumbs-up or upload a “ha ha” instead of typing lol.
in addition to being three-times large than they currently are, emoji can now replace phrases with a easy faucet. Messages can spotlight sure phrases that match a particular emoji, and tapping on them will convert them to a symbol. developing the subject matter similarly, fb-style stickers were blanketed and may be plastered on your message bubbles (no word on top rate decal packs yet).
finally, you could also get right of entry to apps inside messages, which permits you to do neat things like share app content material (think notes, locations, contacts) while not having to go away your conversation. Apple says you could even make bills this way, and who is aware of what else builders will upload?
Revamped Notifications & Lock Screen
IOS 10 includes a today's lock display screen, which incorporates a greater condensed time and date view to permit your notifications to polish and soak up most of the display screen. you could now get entry to the digital camera loads quicker through sliding to the proper, or slide to the left to get right of entry to your widgets (the ones you presently see on iOS 9’s these days display).
sick of pressing the home button to wake your tool, handiest to have TouchID mechanically liberate and pass your notifications? a brand new improve to Wake function way you best want to pick your phone as much as wake it and display your notifications.
Notifications now look cleaner (that is a bit of a subject with this release) and also can update in actual-time, so that you can see exactly in which your Uber is. you can also reply to notifications with a squeeze of three-D contact, which makes notifications a great deal more interactive. Peek at photos or whole message threads without unlocking your phone, though how this could paintings on non-3-D-contact devices stays to be visible (an extended-press, maybe).
Apple Music Overhauled
Apple tune changed into formerly a streaming provider shoe-horned into the antique iOS 8 track app, however all that’s about to change. The interface has been up to date, and track you’ve downloaded is no longer hidden in an obscure menu. There’s a variety of white space, and album art is bigger, but it’s likely we’ll see tweaks among now and the very last release besides.
Apple song join takes a back seat, at the same time as the For You tab gets greater often updated cautioned playlists (once a day), a Discovery blend, and all of your these days performed tracks. the first tab you’ll now see is Library, providing speedy-get right of entry to to your collection.
What many of us really need is performance enhancements, easier ways to populate our collection, and a usually extra first-class enjoy. hopefully the update goes some manner towards enhancing usability too.
More Powerful Maps
Apple Maps has come an extended manner through the years, and although it nonetheless lags behind Google in many respects, it’s proper to peer the organization is dedicated to improving the revel in over the longterm. In iOS 10, this takes the shape of an stepped forward seek functionality, which incorporates listings for brand spanking new points of pastimes like gas stations.
The Maps app can now expect wherein you want to move based to your ordinary, calendar appointments, and modern-day vicinity, and traffic situations will now set off the app to exchange your direction in the hobby of avoiding traffic jams. you may additionally pass round while navigating, pinch to zoom, and even search for points of hobby along your course.
The interface has been tweaked with the addition of what Apple calls brief Controls, which alternate based on what you’re doing. similarly to site visitors situations, Maps can also help you keep away from toll roads too.
And much like Siri, maps is now open to developers — so you can do such things as e book a table or order a journey inside the app, however you’ll ought to anticipate 0.33-birthday celebration builders to implement the feature. In China, Apple has even added an air first-rate meter (the irony of China’s function as Apple’s united states of desire for iPhone production shouldn’t be unnoticed).
Photos Improvements
images adds Google pix-style sorting, however the key difference is that Apple’s processing takes vicinity without delay in your tool as opposed to inside the cloud. the new tech can perceive gadgets, places, human beings, and extra, and it allows you to kind and seek your snap shots by means of these standards.
A lick of paint makes your photos appearance higher, and a higher auto enhance feature have to help too. The digital camera itself receives a brand new interface at the iPad, and stabilization and filters have been added to live pics too.
News Updates
Like many different iOS 10 apps, information is getting a makeover, consisting of a brand new tabbed design that takes its cues from Apple song. A “For You” tab breaks up tales into sections like Trending and subjects like recreation, which offers some a lot-wished order to the news aggregator introduced with iOS nine.
also new is the capacity to subscribe to a specific news source, which means that you’ll by no means omit a post. this is some thing that has been missing on account that Newsstand became retired with the ultimate principal iOS launch. a new Featured information segment affords curated tales direct from Apple, so there’s usually some thing to read.
And lastly, the app now includes breaking information signals through push notifications (because you likely don’t get sufficient of these).
Make Phone Calls Too
One among the largest areas of enhancements that’s surely worthy of your attention comes with your iPhone’s maximum primary function. The smartphone app has delivered a brand new voice-over-IP (VoIP) API that permits apps that use VoIP to behave like a actual telephone name in place of performing as an clean-to-omit notification. The characteristic ought to allow apps like WhatsApp, Viber, Skype, and so forth to appear on the lock screen, entire with a “slide to reply” bar and the entirety.
improvements to FaceTime mean much less time waiting for a call to connect, and iOS will now additionally begin screening your requires unsolicited mail, which must help you keep away from scammers and telemarketers.
For those of you who hate voicemail, a brand new voicemail transcription feature converts audio messages into text, so that you can study them in noisy environments or pick to reply by text message alternatively.
All The Small Things
As with every iOS release, there are many smaller changes that Apple didn’t have a chance to say on level, and a few that just aren’t as exciting as the ones above. among them is QuickType tips, permitting text prediction to do things like answer where you're or provide smartphone numbers for regarded contacts with a faucet.
Apple’s connected-device API HomeKit gets its own inventory app known as domestic, which lets in you to manipulate all your HomeKit gadgets from one interface. And of path, there’s a gaggle of quite new wallpapers which iDownload Blog has already pinched and put online for you to enjoy.
just like iOS 9 and former releases before it, plenty of paintings could have long gone into iOS 10 under the hood too.
Can Your Device Run It?
If you want to run iOS 10, you’ll need one of the following:
iPhone: 5, 5c, 5s, SE, 6, 6 Plus, 6s, 6s Plus
iPad: 4th gen, Air, Air 2, Pro, mini 2, mini 3, mini 4
iPod Touch: 5th & 6th gen
While Apple’s personal Preview page states that the unique iPad mini and fifth era iPod touch also are well matched, that wasn’t what the corporation introduced on stage. having said that, it’s a quite marvelous list of well suited devices, just remember the fact that performance can also go through on older devices. iOS 10 marks the first time the iPhone 4s and 1/3 generation iPad aren’t supported — devices that had been released in 2011 and 2012 respectively.
The iOS 10 beta has been launched to builders, however you’ll need to be careful putting in it on devices that aren’t registered with an Apple Developer account. these earlier builds may be actually buggy, and center functionality can go through, so I wouldn’t suggest installing it for your important iPhone.
Instead, you can sign up for the iOS Preview, which gives every person with a compatible device the opportunity to download a preview construct at a later degree. if you don’t fancy being a beta tester, you’ll have to wait until the autumn — generally across the very stop of September, while new iPhones arrive — to attempt it out for your self.
What’s New in iOS 10? Everything Coming to Your iPhone - Gem Valley
Have you ever deleted a image by means of mistake in your iPhone or iPad? fortunately, if you’re walking at the least iOS 8, it’s truely very clean to get better deleted snap shots – so long as you do it inside a certain quantity of time.
Right here’s the way it works. in case you’ve deleted a picture by way of mistake, navigate returned to the primary menu of your native photo app, which has loads more functions you will be overlooking. You need to see all of the numerous albums you have got in the picture app, inclusive of one approximately halfway down the display referred to as “lately Deleted”.
Tap the album and you’ll see a grid of all of the pix which you have deleted within the past 30 days. you may either choose a couple of snap shots and tap the “get better” button inside the bottom proper-hand corner or in case you want to get better just one picture, you could open that image up and tap the “recover” button inside the equal spot.
In case you wait more than 30 days, the photo can now not be recovered.
If it’s been but a month since you upgraded to Windows 10, you'll be able to return to your previous version of Windows by going to Settings > Update and security > Recovery and choosing either go back to Windows 7 or go back to Windows 8.1. this would possibly not have an effect on your personal files, however it'll take away any apps you put in when the upgrade to Windows 10. Learn more.
If it’s been quite a month, possibility|this feature|this selection} won’t be offered in Settings and you’ll ought to use a different recovery option..
Don’t like Windows 10? As long as you’ve upgraded at intervals the last month, you'll be able to uninstall Windows 10 and downgrade your computer back to its original Windows 7 or Windows 8.1 package. you'll be able to continually upgrade to Windows 10 once more later.
Even if it’s been quite a month, you must be ready to reinstall the version of Windows that came with your computer mistreatment recent installation media and its product key.
Go Back to Windows 7 or 8.1
If you’ve upgraded a computer to Windows 10 — not performed a clean install, however Associate in Nursing upgrade — you’ll have a straightforward choice that allows you to revert to the last version of Windows. To access this, open the beginning menu and choose Settings. Click the “Update & security” icon and choose “Recovery.”
You should see a “Go back to Windows 7” or “Go back to Windows 8.1” option. Click the start button to induce eliminate your Windows 10 install and restore your previous Windows install. Microsoft can raise you why you would like to travel back.
If it’s been over a month — or if you’ve run the DIsk cleanup tool and removed the “Previous Windows installations” files or deleted the C:\Windows.old folder by hand — you’ll not see this selection. Windows ten seems to mechanically take away the recent Windows installation files when a month to unlock house.
This Uses the Windows.old Folder
This works as a result of Windows 10 stores your recent Windows installation within the folder named “C:\Windows.old” on your laptop. you'll be able to see this folder in File someone, tho' you shouldn’t decide to delete it from here. you'll be able to additionally browse the Windows.old folder and restore files from it.
Obviously, storing each file from your recent Windows installation takes lots of house. If you open the Disk Cleanup application, you’ll see simply what quantity house it uses. Click the beginning button, sort “Disk cleanup” to look for it, launch it, and click on the “Clean up system files” button.
Find ‘Previous Windows installation(s)” within the list, and you’ll see simply what quantity house it’s intense on your drive. If you’re certain you don’t need to travel back to your previous version of Windows, use Disk Cleanup tool to get rid of those files and now unlock house.
How to Downgrade if Windows 10 Doesn’t offer you the choice
Assuming you have got Associate in Nursing recent laptop you upgraded to Windows 10, that laptop antecedently had Windows 7 or 8.1 on it. meaning that laptop came with a product key that enables you to use Windows 7 or 8.1 on it. to induce back to Associate in Nursing older version of Windows, you’ll ought to perform a clean install of Windows — one thing computer geeks typically do on new computers, anyway.
Thankfully, Microsoft currently offers simple downloads for Windows 7 and 8.1 ISO files. transfer the Windows installation media and burn the ISO file to a disc or copy it to a USB drive using Microsoft’s
Windows USB/DVD download tool. you'll be able to then boot from it and install Windows 7 or 8.1 fresh, telling it to write the Windows 10 system already on your drive. take care you have got backup copies of all of your necessary files from your Windows 10 computer 1st.
You’ll ought to notice your PC’s product key if you are doing this. On a Windows 7 computer, examine your computer for a “certificate of authenticity” sticker with a key thereon. They sticker could also be on the face of your laptop computer, within the battery compartment beneath a removable battery, or maybe on a laptop’s power brick. On a Windows 8 computer, you will not ought to do that in the least — the key could also be embedded in your computer’s code and Windows 8.1 can mechanically observe it and permit you to install Windows 8.1 while not even asking you to enter a key.
If you acquire a replacement computer that came with Windows 10 and you would like to travel back to a previous version of Windows, that’s harder. to try to to this lawfully, you’ll ought to purchase a Windows 7 or 8.1 license and install it from scratch, getting into the merchandise key you bought throughout the install method.
If a very important program or hardware device you utilize doesn’t work on Windows ten, you’ll need to downgrade. If Windows ten simply looks unstable, you’ll need to travel back to your previous version of Windows Associate in Nursingd wait a short time longer before trying an upgrade. Or, if you’d simply rather suspend onto Windows 7 for a short time longer, you'll be able to downgrade.
Windows 10 can stay a free upgrade for the primary year, after all.
Do you ever paintings on computers that aren’t your personal? Ever discover yourself pissed off at not being approved to install your own applications, or having to conform to distinctive settings after you’ve already personalized a laptop so it really works simply proper for you?
What if I told you it didn’t should be that way? What if I told you that you may bring round your own model of windows on your pocket, ready to run on any pc you can come across, with all of the programs you generally use already established and installation precisely the way you like?
well, you could. Don’t worry, I won’t keep you in suspense. right here’s how you could set up your very own windows 2 cross USB force (or outside power, in case you pick) in an effort to allow you to run home windows eight or eight.1 everywhere you need to. It’s unfastened, it’s transportable, and it’s yours.
What Is Windows To Go
Windows to move is a version of home windows eight.1 organization designed to run on a transportable device inclusive of a USB flash power or external power. you can install applications, and paintings with documents saved on the drive, however you’ll must sync any apps you could have purchased from the windows store manually.
What You Need
You’ll need a USB Flash power with sixteen GB or better (32 GB might be perfect, so you can hold documents on it), or an external pressure. There are licensed USB drives for this undertaking, but you don’t want them with those commands.
an authorized USB force will make certain your home windows to move set up will work nicely and boot up fast. even as a everyday drive will work too, understand that it may be slower — everywhere from taking a few greater moments besides up, to 30 or 40 mins extra in addition up. USB three.0 will assist, but your mileage may range. you may additionally want:
An ISO record or CD-ROM of the set up files for home windows 8, 8.1, or 10. With this method, you do not need the corporation license besides for home windows 10. you can down load an ISO of home windows 10 from Microsoft.
Rufus, one in every of many gear that lets you create bootable USB drives, or that allows you to use command line (it’s no longer hard in any respect).
GImageX, the device that helps you to placed the windows set up documents onto the USB. You won’t want this if you are the use of a certified USB power.
How to Set Up Windows To Go
First, plug your USB into your laptop and make it bootable. which means it'll be able to maintain an operating gadget, and it will be capable of release it when you begin up your laptop.
you can make a USB bootable with Rufus or using the command line, which tends to be more dependable.
Command Line Instructions to Make a Bootable USB
Rufus could make a USB bootable, but sometimes it is unsuccessful. If you could use your command line, it received’t fail.
Comply with those command line commands.
input diskpart
input listing disk
pick out the disk range that represents your USB. it is going to be the only with more or less the quantity of GB that your USB has. In my case, it’s the one that announces it has 14 GB.
as soon as you recognize which disk range, input the command select disk [x] with out the rectangular brackets, and with your disk wide variety in location of the x.
enter clean to clean the disk.
enter create part pri to create a partition.
enter select element 1 to pick out the primary partition.
enter lively to mark the partition as active.
enter go out
ou can take a look at that your USB drive became bootable with a force partition manager like AOMEI Partition Assistant — it must be flagged underneath repute as “lively”. You’ll need to layout it to NTFS.
Now your USB force is bootable and equipped on your home windows to go installation.
Imaging the Windows Installation files to your USB
to position windows at the organized drive, mount your windows ISO documents, so that you can get right of entry to the set up.wim files.
To mount your windows ISO files, open the context menu by using proper-clicking on the ISO report for the model of windows you want hooked up on the USB. There must be a menu choice as a way to allow you to Mount the pressure.
Now that your home windows ISO documents are installed, open GImageX. This program affords you with a graphical user interface to finish this deploy, with out a certified USB stick.
Under the Apply section of GImageX, click the Browse button and navigate to the sources folder on your mounted ISO file and select the install.wim file.
Click Apply and settle in for what could be a long wait, especially if your drive isn’t very fast.
Mine estimated a five hour wait, and finished in a little over four and a half hours.
After it’s done installing, you’ll be able to use Windows To Go in a computer set up to let you boot from things other than the main operating system.
How to Boot from Your Windows To Go USB
One thing you need to recognize about this mission is you could’t simply plug the USB into your pc, turn it on, and expect it to run. First, make sure that the laptop’s BIOS is ready in addition from an outside USB (flash) power, before proceeding with booting from the device force.
As Joel explains in this text all approximately the BIOS, it’s the first actual piece of software program that runs to your computer. It stands for simple enter/Output device, and in case you make an effort to set it up well, you can host more than one working structures for your computer, and trade which one it boots into first.
If that is the first time you’ve tried to run an alternative running device than the one that got here with it, don’t worry. Chris explains a ramification of BIOS issues such as the way to trade the boot order in your computer here at MakeUseOf.
After your BIOS is set up well, you can plug your USB into a port to your pc. it can take a long term in addition, in case you’re running it on a non-licensed USB — upwards of 30 minutes for me (your mileage may additionally range considerably relying on the read-write pace of your USB, of route), but an authorized one should boot in just a couple mins, or quicker. because it starts offevolved up, pick out it from the BIOS and it should launch proper into the model of home windows to your windows to move drive.
Now You Can Carry Windows in Your Pocket
There you have got it: windows, for your pocket. Of direction, you’ll must set it up with your preferred settings, but when you do this, they’ll live.
what's going to you operate home windows to go for? What different portable apps will you aspect-load on any remaining area you have? Do you run any other working systems on a non-conventional laptop or external pressure, and in that case, what do you run and why? let us know inside the comments under!
How to Create a Portable Windows To Go USB Drive - Gem Valley
On a Mac, you can take screenshots with some short keyboard shortcuts. however Mac OS X also includes more powerful screenshot gear, too. right here are a number of the various methods you may get a screenshot on OS X.
Take a Screenshot of Your Entire Screen
Permit’s start with the ones keyboard shortcuts. To take a screenshot of your complete display, press Command+Shift+three. Press all three keys immediately and your Mac’s desktop will flash, you’ll pay attention a digital camera sound, and the screenshot will seem on your computing device as a .png file.
Take a Screenshot of Part of Your Screen
To take a screenshot of a part of your screen, press Command+Shift+four as an alternative. Your mouse cursor will become a crosshair icon. click on and drag to choose part of your display screen. launch the mouse button and that a part of your display could be stored as a .png file in your desktop. To cancel the screenshot, press the Esc key.
Take a Screenshot of a Window
you could also take a screenshot of a selected window. First, press Command+Shift+4. Your mouse cursor will turn into a crosshair. Press the Spacebar and your mouse cursor will grow to be a digital camera icon alternatively. move your cursor over the window you need to screenshot and it will appear highlighted. click the window and a screenshot of that window will appear for your laptop as a .png document.
Save Your Screenshot to the Clipboard Instead of a File
in case you’d want to store a screenshot in your clipboard so that you can paste it into an software in place of saving it to a record, simply add the manipulate key to the shortcuts above. for example, you’d press Command+Shift+manipulate+three in preference to Command+Shift+3 and Command+Shift+manipulate+4 rather than Command+Shift+four. (Yeah, you’ll need plenty of arms for this.)
you can then use Command+V to stick the screenshot into an utility, or click Edit > Paste in the software.
Change the Folder Where Your Mac Saves Screenshots
Screenshots you're taking with the keyboard shortcuts might be saved directly on your Mac’s computer with the filename “display screen Shot [date] at [time].png”. however, you may change in which your Mac saves those screenshots, if you like. for instance, you can make your Mac save screenshots without delay to a Dropbox, Google force, or Microsoft OneDrive folder.
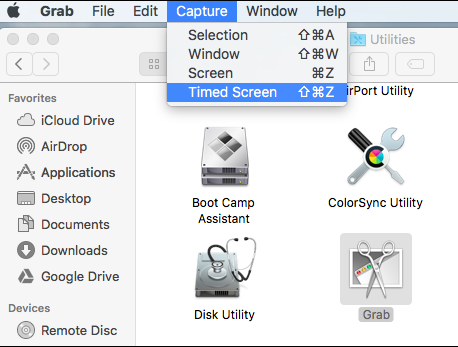
Take a Timed Screenshot With the Grab Application
In some cases, you may want to take a screenshot the use of a timer. You start the timer, which lasts for some seconds. while the timer expires, your Mac will take a screenshot of your whole screen. that is useful when you could’t take a screenshot of something–a menu, as an instance–that hides itself while you start pressing the keyboard shortcut keys.
To try this, use the snatch app included along with your Mac. you could launch it by urgent Command+space to open highlight seek, typing “snatch”, and urgent “enter.” you may additionally open the Finder and locate it at packages > Utilities > snatch.
snatch won’t open a window to your laptop, but launch it–or click on it in your dock–and also you’ll see a seize menu on the pinnacle of your display. click on seize > Timed display to take a timed screenshot.
click on “Srart Timer” inside the Timed screen grasp window and also you’ll see the timer be counted down.
Your Mac will take a screenshot after ten seconds and it's going to seem within the snatch window. click record > keep to save the screenshot if you’re glad with it.
you can additionally use the snatch software to take other types of screenshots with the capture > selection, capture > Window, and seize > display options. however, you’ll possibly locate it simpler to take screenshots the usage of the above keyboard shortcuts.
Take Screenshots With a Third-Party Application
There are a wide style of 1/3-birthday party apps on your Mac that can help you take screenshots, too. Many humans have their very own favored software, but we’ve used and like Skitch for Mac.
Evernote purchased Skitch and has killed off the Skitch programs for all other systems, however still gives the Mac app–likely as it’s so famous. Skitch gives a ramification of easy editing features for easily resizing, cropping, and staining up your screenshots. It’s also absolutely free. You don’t even want to register with an Evernote account to apply it.
once you've got your screenshots, you may double-click the .png documents to open and examine them within the Preview app covered with Mac OS X (except you’ve selected any other image application as your default software for PNG documents). Preview additionally protected a selection of a ramification of gear for enhancing those screenshots and different images. To document a video of your Mac’s screen rather than a screenshot, use the QuickTime application covered with Mac OS X.